

In that light....
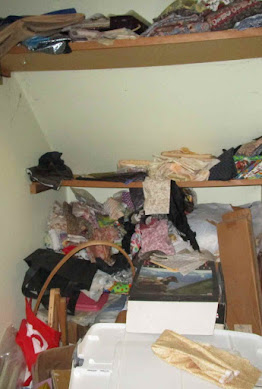
Yeah, I know terrible right?! In my defense, the fabric I use the most is neatly organized in my studio. This dressing/stash room is right off my new master bath and acted as a staging spot while Paul did the remodel. He promised he would remodel this room too but first he had to re-paint my Victorian which was no small task. But finally, it's my turn! The room is going to get new flooring, shelving, and a paint job. (notice the nasty LIME green carpeting from the '70s remodel!) I think I'll even convince him that it needs decent lighting. (It sits in the eaves of the former attic)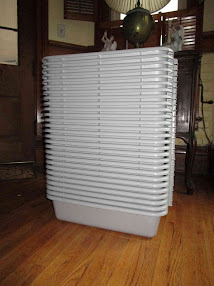
So I'm going to repeat the idea that I hit upon for my studio. I'm going to use dish busing tubs. They are 20" by 15" by 5" so they are big enough to hold a bunch of fabric but not too big that you can't easily carry them around. I bought them at a restaurant supply store for the cheapie price of $4.80 each shipped. They are definitely sturdy enough for fabric. What I really love about the bin idea is that you can easily pull it down from the shelf, try out the fabrics you need and neatly pop it back to its rightful place. If you get more fabric, you can easily reorganize it. I've been using them for two years in my studio and my fabric is always neat. I figure that 24 28 of them will do the trick. (It's hard to believe that 12 years ago I sold off a quarter of my stash!)
This is what my stash shelves have deteriorated to....
 |
| The Before |

Yeah, I know terrible right?! In my defense, the fabric I use the most is neatly organized in my studio. This dressing/stash room is right off my new master bath and acted as a staging spot while Paul did the remodel. He promised he would remodel this room too but first he had to re-paint my Victorian which was no small task. But finally, it's my turn! The room is going to get new flooring, shelving, and a paint job. (notice the nasty LIME green carpeting from the '70s remodel!) I think I'll even convince him that it needs decent lighting. (It sits in the eaves of the former attic)
I decided that I didn't want anything too fancy but I did want it to be practical. One thing that I learned over the last 30 years, is that open shelving does not work for me. I am incapable of keeping all the varying lengths of fabric organized in any semblance of order. (Here it is in 2009 with me having the same problem!) Plus getting at just the right piece of fabric is always a chore. Every few years I would have to day HOURS folding and straightening

Getting the bins unboxed and taking a hard look at the stash shelves really was a wake-up call on how big a job this will be! The whole thing is compounded by the fact that the house is 3 stories so it will be a lot of up and down. Not to mention that I have boxes of fabric throughout the room that I intend to organize into tubs. I did recruit my friend Lisa to come over and help 'cause, ya know, why have friends if you can't put them to work?!
I keep reminding myself how much better I felt once I got my studio into order and that was a bigger job than this one. I promise to show you the after pictures!
How do you store your fabric? Has it been a struggle?
So What Have You Been Up to Creatively?
3 comments:
oh yes it is a struggle. I just bought more containers so begins the hope for a better plan.
I feel your pain. I’m in the process of reorganizing now. I went from plastic storage containers to 12 X 12 cubed shelving.
My stash closet looked similar to yours last September. Good luck!
Post a Comment