Showing posts with label studio. Show all posts

Friday, February 6, 2026

2026 Reset Continues on Off the Wall Friday


Yea know, sometimes I wonder why I keep blogging. I mean, it seems that in this ever-changing world of technology, things come and go.  And blogging probably has had its time.  Why read a 5-minute post, if you can have 2 minutes of content spoon fed to you on Tik Tok?? 

Then I remember the main reason I keep going is so that it keeps me going. Without my weekly post, I would just shut down creatively 4 months a year and peak my head out when it turned March. 

  Is it just me or does it seem that as we get older the weeks go faster?  It's like the months just run into each other.  And here we are already into February! So, my reset continues.  

I happily can report I did finish my studio...

The before....


The After....


The thing about my studio is that it's little but functional.  After many failed attempts this set up works the best for me, but the secret is I have to keep it cleaned.  Andddddddd the secret to that is everything has its labeled place.  So Whaaaaa-Laaaaaaa a Reset! 

Also this week, I manage to learn how to use Notion as a catalog for my creative journey.  Does anybody else use it to help keep track of your projects?  For me, with a blog and pinterest it's a little redundant but I needed it for my Rug Hooking Journey class, so I buckled down and posted my Santa Rug to it.  I'm not sure how I feel about it yet.  So far it seems a little clunky but that could be just because I'm so new to it.  

Now that I turned my studio back into a sewing space, it's time to get back after my BOM quilt from 2023!  Honestly, I have no idea where I stopped...but I did keep all my fabric together in a bin marked "Project" (one of my smarter moves!).

There's the tub of my BOM Project!

That's all for me this week ...  what can I say?  it's cold and dark out!

What Have You've Been Up to Creatively?


You are invited to the Inlinkz link party!

Click here to enter

Friday, January 23, 2026

The Storm before the Calm on Off the Wall Friday

View from my window
 Yes winter is in full swing here on the Great Lakes.  I know this has become an annual rant but LORD I hate the snow and the havoc it brings.  Storms are so destructive to the routine of everyday life.  It makes me want to hibernate rather than my goal of resetting.  

Let's face it.  Saying you're going to reset and actually doing it are two different things.  This week, I set out to walk the walk to go along with all that talk last week.  To that extent I had to start digging out my studio. 

Right now, I can easily say my studio is going through an identity crisis. It's a small space to begin with and to bring another art form into it is going to take some ingenuity.  But first things, first it needs digging out....

Right now it looks like this....

I believe in showing it all


Not just the pretty pictures  'cause the struggle is real 
And if you know you know..


I took a little time each day getting things put back, cleaned up and thrown out.  I was doing good actually...until I came to the elephant in the room.  Well - rather - the sheep.  What was I going to do with the small stash of wool I had accumulated?  Storing it in bins was not ideal...its hard to see what you own and find what you're looking for.  Not to mention, it's best to store wool in a well-ventilated area.  That really meant I needed to get more shelves.  But where to put them?  

Luckily, I took the problem to my husband and he said why don't you buy them with wheels and they could slide back into an under utilize corner.  That way you can slide them out when you need them and tuck them back when you don't.  Oh he's smart...no wonder I married him!

The trick to buying good shelving is to figure out what you want to store, how you want to store it and how much space you have.  THEN take all that information and head to Amazon which has a ridiculously huge variety of sturdy, inexpensive metal shelving.  I decided that I wanted 6 tiers, about 30" long by 15" deep on wheels...for under $75.  It took a while I found buy what I was looking for. 

I sorted and folded the wool and it easily fit.  I took all the smaller pieces and put them in a bin that fit on the bottom tier.  


It went from this....


To this....a perfect solution for $61...I'm all happy.


You'll have to wait to see the final reveal of the whole room because I'm not quite done yet.  I've been working steadily but I don't want to get all crazy.  

Speaking of crazy...here's what's new on this week's Rug Watch! Little by little, he's shaping up.   I'm getting the hang of hooking yarn.  It gives a more nubbly texture that is appropriate for the trim of his vest.  But it's harder to control that's for sure....


That's it for me...What Have You've Been Up to Creatively?

You are invited to the Inlinkz link party!

Click here to enter

Friday, March 8, 2024

Pegboards for Quilting on Off the Wall Friday

My Pegboard, white, cut to fit the space, painted stripes, electric orange tape.
Baskets, cups used for additional space, labeled

So today I read an interesting post on my Sewing/Quilting Organization list on Facebook.  A member was looking for ideas for the use of a pegboard in her sewing space and asked for pictures.  My first thought was lots of people must have pegboards and they all must use them the same way.  

Apparently, I was wrong.  As goes it with a list of 110K (yes you read that right 110,000!) quilters/sewers, you get many opinions and ideas on how a pegboard can be used.  With the permission of the owners, I thought I would share some and why I think they are great!


Barb P. hasn't taken up the full wall - cut at a rectangle it can easily be reached plus room for a great bridge painting.


Christina S uses her to store fat quarters of fabric in attached baskets


Angie O. proves that bigger isn't always better


             Beth R decided to paint hers individually and place them near her work tables
                                           (notice - another  Janome 7700 owner - yay!)

Shere R. organizes her thread and lets the color inspire her.


                                          Diane P framed hers and added Criscut Lettering  
                                          Plus notice how the envelop baskets are so handy!

Raelynn W uses her corner brilliantly


Perri E. K. uses the pegboard traditionally but look how GREAT this looks
The Mugs are perfect!!


Patrizia S.  Shows how you can store just about anything on a pegboard.


Great Ideas Right?

Do you use a pegboard?  How?  
(Also, I am still looking for people who might want to share their sewing space here on the blog and answer questions on how it came about ... just use the "Contract Me" widget on the right!

You are invited to the Inlinkz link party!

Click here to enter

Friday, October 14, 2022

Sewing Organization on Off the Wall Friday


Seeing Toni's great studio last week brought to mind how important it is to stay organized.  I mean, let's face it, quilters accumulate a lot of stuff.  I mean if I'm being honest, one of the best things about being a quilter is having a good excuse to accumulate stuff.  I remember once I had a teacher who encouraged me to take up another hobby, rug hooking.  I laughed and said I didn't have time for the all the quilting I wanted to do now.  I could not possibly take up rug hooking.  "But think!" she winked. "You could go out and buy all new stuff!"  Well, there is that.  (For the record though, rug hooking is still on my bucket list!)

For now though, all I have to do is organize my quilting passion.  

Before I start though, let me preface this with that not all people like to be organized.  Some feel more comfortable with all their stuff strewn around them.  If you are one of those people, more power to you, and stop reading here.  

That said, I, myself like to stay organized.  How?  

#1 Be Thoughtful

#2 Be Persistent

#3 Be Creative

BE THOUGHTFUL....Finally, during my last two studio makeovers, I realized that every organizational project starts with a thoughtful plan.  STOP!  Think about it!  What do you want to organize?  How do you want it to work for you? If you're on a budget, how can you do it cost-effectively?   Come up with a layout that will work the way you work! 


 Right now, I'm using a "L" layout with my work table (doubling as a cutting table) perpendicular to my sewing table.  My work table also has a big pressing board on it that can be reached from my chair.  So without getting up, I can cut, sew, and press.  All while looking at my design board.  How did it take 30 years for me to come up with THAT plan!

Also, I want to mention the importance of having the right furniture.  You want to have the right-sized


furniture for space AND function.  Now, I'm not saying you need to go out and buy specialty furniture.  I'm in the upcycle and repurpose furniture.  My chunky work table was going to be thrown out at the lab I worked for in my former life.  I LOVE my table.  I've seen plenty of IKEA hacks out there.  Also, today I was looking at the clearance section of Bush Furniture which has the greatest office furniture that can be used in a sewing area.  (My work-from-home setup came from this section 6 years ago, and I swear it's indestructible)  So when it comes to furniture, don't be afraid to think out of the box!

I LOVE this idea
BE PERSISTENT...This is all about creating a habit that works for you.  I have never been accused of being a neat freak, but when it comes to my studio, I do tend to keep it tidy.  How?  When I leave it after
every session, I give it a quick pick up.  I leave whatever I'm working on all set up so I can pick it up where I left off.  Any clutter that got created that day gets picked up.  Then at the end of a project, I do a big clean of the room putting EVERYTHING  back into its proper place.  (For me, I found that giving everything its own "place" with a label is the easiest way to keep things organized.  Yes, it's anal, shrug, but it's working).  YES, I do this every time I work, every project.  Now, I never have to do big overhauls of my workspace.  You can see a good example of one of the few times I did the clean-up before the work session began rather than after HERE.


BE CREATIVE...Very few of us have unlimited money to spend on our sewing rooms.  This means it's good to get creative when you're setting up your space.  I highly suggest pursuing Pinterest to get organizing ideas.  There are endless ways to store fabric, thread, bobbins, rulers etc.  Don't be afraid to steal one for yourself.  

I use this for my scraps. Each Bin holds a different color (all for under $50 from Amazon)


What are some of your favorite ways to stay organized in your space?  LET ME KNOW!


You are invited to the Inlinkz link party!

Click here to enter

Friday, October 7, 2022

Sew Spaces with Toni Raynolds on Off the Wall Friday


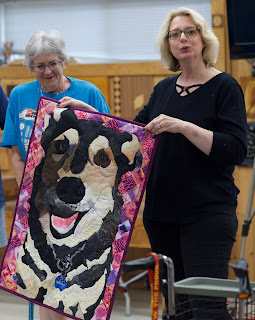
Toni with her Mosaic Dog
 I love seeing where other people create.  Normally, I'm not the nosey type, but when it comes to seeing people's sewing spaces, the voyeur in me comes out! This tendency popped up recently when I asked
my new friend, Toni Raynolds, to show off her space.  I met Toni in a class we took with Timna Tarr at Marc Adams School of Woodworking.    Toni's space seemed to strike the right balance of practical and cozy so I thought I'd ask her to share it with everyone.

Thanks, Toni for accepting my invitation to share your space!! 

Can you tell us a little about yourself and your quilting journey so far?

Sure!  I was born and raised in the bluegrass state of Kentucky where I still reside today. I am blessed to live in horse country in Lexington, KY near Keeneland racetrack and tons of gorgeous horse farms. I've been quilting for about five years now but until I started quilting, I didn't believe I had a crafty bone in my body.   Thankfully due to a sewing machine my mother bought me and a quilting ministry at our church, I am now completely obsessed! At this stage, I find myself still exploring every technique possible and learning as much as I can. My mother says I love those "artsy fartsy" style quilts while she leans more towards traditional style quilts. I don't think I found one particular style that defines me as a quilter....yet. One day maybe. I'm always up for something new!


Where is your sewing space and how did you pick it?

My Sewing space is on the first level of my home in a room that looks like it's supposed to be a spare bedroom. It's a rather large space and so it seems to be the perfect fit.  I don't really have a fancy name for my space. It's just my "sewing room" as it reads on the sign made by one of my quilting buds.

How did you come up with the layout?

Oh, the layout.... that's a constant challenge and it seems every 4 to 6 months I end up rearranging it.  The current layout seems to work the best for now because even though the room is fairly large, I have collected a lot of stuff. So trying to fit three tables all with their own sewing machine, a cutting table, a wall of fabrics and a longarm was a real challenge. I have found though that having a horseshoe layout for my sewing tables is the most effective.

My longarm is located towards the back of the room with a nice view of the trees and animals out the window.


For me, it was really important to have my fabrics and my threads out in the open. I love seeing all the pretty colors, plus it makes it easy to find and store fabrics or choose that perfect thread.  My thread holders were custom-made by a wood craftsman in Berea Country, which I think of as the crafting city of the U.S. The artisans found here are amazing.  The thread cabinets are a modified version of  a pattern by Vos found on Etsy.


My fabric wall is made of an IKEA Kallax 5X5 cube unit and it works perfectly. I also have other bookshelves and smaller IKEA units to keep my fabric out in the open for easy selection when sewing. It also has several doors at the bottom for storage of additional items I may need to access easily such as spare starch, comic boards (which I use as a mini "bolt" to wrap my fabric around), etc.


I also love repurposing old CD storage shelves to convert them into fat quarter, jelly roll storage, etc.  Ikea's CD tower is perfect for this purpose. I have also bought several of these at thrift stores. My favorite one is the rotating tower. 

Lastly on the opposite wall is where I have my cutting table where I store additional threads, project boxes, and various stabilizers/tools stored for quick and easy access,


What is your favorite part of your space? 

I love all of it. So it's difficult to point out just one single thing, but I do know that my vintage, hand-crafted sewing cabinet is one of my most treasured items. My husband bought this for my birthday a couple years back because he knew how much I loved it. It's perfect for holding extra threads, buttons, zippers, and all kinds of items I may need but are not critical to have close at hand. This was handmade for the previous owner by her son. I feel so blessed to be the current keeper of it until it's ready to pass on to someone else as a beloved treasure.


What is your least favorite part of the space?

There are really two things. First, since adding the long arm to the room, I can no longer access the bottom of my floor-to-ceiling design wall which I customized and attached to the wall following a very easy/cost-effective method similar to this one on Swim Bike Quilt's blog. The only other thing I'd like to be able to change is the placement of my sewing machines. I'd really like to have those in front of my window instead of the longarm but for now, this setup is the best because when I had the long arm in the front of the room, I was always bumping into it and had to walk around it.


You told me you're going to start selling fabric online.  Can you tell me more about that?

YES! I'm sew excited about this opportunity to turn my passion into a real business. I started out selling crafts on Etsy but have decided to do a reset and transition my business into an online quilt store where I will sell fabrics, books, patterns, and notions.  Plus I'll offer classes and tutorials. I'm working on restructuring my store right now and hope to re-launch by the end of the year.  Sharing my love for quilting and sewing as well as, having the opportunity to share my experiences to help others grow as quilters is something I have a strong desire to do. I hope launching my new fabric store, SewcialArts, will be a stepping stone towards getting there.  So, be on the lookout for lovesewcialart.com! In fact, if you visit now, you can sign up to be notified as soon as my store launches!

Thanks, Toni for sharing your sewing space.  It's amazing!!

I hope in the future to be sharing other people's sewing places.  I find it fascinating how people set up their places to create!  

If you have a blog post on YOUR SEWING SPACE...please feel free to link it on the SEW MANY SPACES blog link-up that is perpetually open.  Also if you know of someone who would like to be interviewed for this series, please feel free to contact me!

So What Have You Been Up to Creatively?

You are invited to the Inlinkz link party!

Click here to enter

Friday, July 17, 2020

The Zen of Repetition on Off the Wall Friday

It's been hot.  I mean really HOT....well at least for the Lake Erie region it's been hot.  With that I've spent a lot of time hold up in my air conditioned bedroom doing hand work on my pinwheel's quilt.  There is something relaxing about the white noise of the conditioner  and just stitching piece after piece.  It's meditative and soothing.  Many summers I've spent the dog days of August finishing up hand quilting for our county fair.  I love the repeating of the small little stitches adding so much texture where once there was none.  Sighhhhh.....No fair this year....no quilting this year.....but still the dog days are heading our way.  So I guess my English paper piecing project is just going to suffice.


I'm not the only one that finds repetition soothing though.  I was reading about  collagist, painter Sarah Gee Miller this week. She's such an inspiration. Reading her story, you can see how she's a lady who realizes that you need to work hard for your art, but she has also learned how to find peace in it too.  Concerning her series Eye of the Storm, she writes, "a series of hypnotic repetitions either in circular or hexagon form. There is a striving for balance between optical thrill through saturated colour and calming an agitated mindset through rhythmic and repeated bands." Her video Make A Drawing on a Machine is crazy!!  (its a record player...with Led Zeppelin on it ...she thinks.)
She says of her work...

"My work is very meditative.  It's a familiar dance, and I know all the moves.
 I'll spend eight hours painting stripes and making sure every single line is perfect
 or laying down thousand of individual dots  - and the thousandth one 
has to be as perfect as the first.  I don't really know how or why I can do it.
 I'm not really a patient person.  I guess it's pure stubbornness"

Although I'm not such a perfectionist, I can totally relate to the idea of doing something over and over for the greater good of a larger piece.  Although one stitch, one quarter inch seam, one square might not be much....added over and over and over...it adds up to a LOT of beauty and interest and texture and well you get what I mean.  

I hope you take some time to look over Miller's work and find some inspiration in it!

Things I Like!

So I put the final decorative touches on my studio.  At the beginning of the project, I said I was NOT going to get all girly do cutesy decoration.  Well apparently, I was kidding to myself and ended up doing a few cutesy projects!!

Paper Machete Letters filled with rice and mod podge covered with decorative scrap paper (cost about $7 & 3 hrs)

Chip Board letters spelling out a reminder that I'm am there to get things done (cost $10 and 30 min)

Contact paper to cover the grey bins that I decided where to industrial (cost $14 and 4 hrs) 

Andddddddd my daughter pulled out her camera and came up with some shots that are suppose to remind me of why I love summer!!!


So What Have You've Been up to Creatively?
You are invited to the Inlinkz link party!
Click here to enter

Friday, June 12, 2020

Sewing Studio Make-Over ... Off The Wall Friday


So over a month ago, I decided that my studio needed a full over haul.  I  mean if you can't do a make over of your sewing room during Stay At Home Orders when can you??  I knew it was bad but I really hadn't a glimpse of how bad.  Since the federal government was kind enough to send me back some of my tax dollars, I thought I would spend some and stimulate the economy!  I set a budget of $400.  Originally when I did my studio, I tried to spend as little as possible reusing things I already had.  The first time I did my studio  it cost about $250 mostly for the design wall, wood for my sewing machine table, my peg board, lighting and paint.  With the new extra $$  I added some things that I really have been needing.

So you can see the beginnings of my make-over  saga here.  When I say saga, I had no idea how long it was going to take.  Sorting, researching, ordering, unpacking, assembling, reorganizing, and finally donating!  My gosh...who knew??

My sewing studio is in the front parlor of my 150 yr old Victorian.  Its not big...about 250 sq ft but its away from the rest of the house and has nice closable french doors.  Still over 5 years there were some things that weren't working and I really needed to change....

Before


Fabric storage that was too bulky, too high AND in front of a big glass door 
and didn't hold all my fabric effectively 

Notions cabinet  located in a corner that is unorganized and buried in a mountain of stuff
Pegboard not effectively used leaving a lot of things on the table, 
Sewing machine table at the end of the table with electricity awkwardly placed
my scraps all in bags in the fireplace


In Short ... it was a God Awful Mess.  This is exactly how it looked on the day I started.

After

New Wire shelving with bins that hold color coordinated fabric
Thread boxes arranged by color and type
All clearly  labelled
(cost..$300) 


Reorganization of the pegboard adding labels and more hooks
Adding one cup labeled PAPER ONLY for paper scissors
My family loves this - they use scissors and then put them back
(cost $20)

New binders decorated by downloads from Etsy 
(cost $20)


Notions cabinent reorganized with storage stack-able  boxes
(Cost $15)


Fireplace holding bolts of fabric and Silks
(Cost $0)


Cube Storage arranged so the big window is clear
Holds scraps organized by Color
(Cost $50)

I did do a little shopping at Hobby Lobby for some decorations and put up a few of my quilts using hooks and binder clips (so they can easily be switched out).  I had to buy a label maker (which was one of my best ideas EVER). Also I bought new surge protectors and extension cords.  That all came to about $60.

So final Cost ???  $465
 So worth it!!  I can now see the floor....my fabric is neatly organized and should stay that way as I do projects....my pegboard is easily used for me AND my family - things go right back to the placed labelled!  Not to mention, the room has a new vibe.  Its old  chaotic clutter is not good for me to create.  Now when I walk in  I see a clean slate - just waiting for new possibilities.

So things I want to mention.....The metal shelving is a great investment.  It is totally changeable and you can add or subtract as needed.  I did add 3 more shelves because I had more fabric than originally thought (go figure - lol)

The cube shelving is also reconfigurable to suit your needs and is super inexpensive.  The bins can be added or taken away if you want shelving or bins.  They are just super neat and easy to put together.

I bought all the little stackable boxes at JoAnn's on sale (they have them at Michael's too).  Totally worth the $1 they were.  OMG ...not only does stacking them make it easy but they were easy to open and close PLUS label.

I hope you found this helpful if you decide to do your room.  Remember what people say is right.....its not about size....it's how you use it!!! (OMG did I just put that out online lololol!!)

If you have any questions, please put them in the comments and I'll answer them.

So What Have You Been Doing Creatively??


You are invited to the Inlinkz link party!

Click here to enter